Wood Shed Blueprints - The Advantages of Owning a Garden Shed
Wood available in a region will depend on the climate and the geographical location. Timber increases in weather resistance after pressure treatment, so use pressure treated lumber as much as possible (plans for building shed). There is no point in selecting a high quality lumber with a fine grain if you are just going to cover it with paint, so in such a case you can go for a lesser quality wood. Pick a beautiful grain of timber if you would not be painting over your shed or would like to use a clear emulsion.
Try to purchase wood which is of the best possible quality but still within your overall budget. To keep costs low, you could choose to only use the best brand of lumber for the vital load bearing parts of the shed like the posts and beams (how to build a garden shed). For constructing the interior sections like the floor panel or window frames you can use cheaper varieties of timber. This way you will be able to build a sturdy and durable shed within a budget.
In recent times, people have been buying so much stuff which they don’t really need, that they soon find they have run out of space both in their home and in their garage. If you are one of those folks who like to store all the items they ever purchased you will soon find that your garage is overflowing with junk.There may be many items in your home you do not wish to throw away just because of the fond memories linked with that item. Is your habit of hoarding up items causing your home or garden to look like a junkyard with stuff scattered all over.
You need a storage shed.The efforts and money it may take you to construct a shed will be repaid back to you many times over by the lifetime extra storage space you would be creating for yourself.In just a couple of days with some proper planning and good craftsmanship you can build yourself a neat little shed.Get the shed plans and follow the directions step by step and before you know it your shed project will be complete.
It will be easy for you to construct the shed base if you just stick to using the measurements provided in the shed plans. Your work will be greatly cut down if you build a shed whose sides are of standard size like 10 feet or 12 feet. Make sure you keep the windows pointed in the direction of the wind to allow for easy natural ventilation. If the land has a slope place your shed door towards the lower end of the slope. Verify that the land on which you will be building the shed is firm and solid without any sand pits. If your area receives heavy snow or rains you may want to make a deck to keep your shed foundation a some inches higher than the ground.
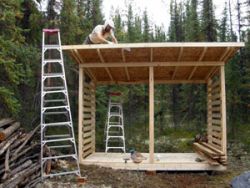
Walls can also be framed separately and then secured into place later on. Finally, the most important part of the shed which much is built with the utmost attention to details is the roof. Inexperienced craftsmen will be better off buying pre-constructed roof trusses rather than constructing them their own. Build the ridge beam first then fasten the joists to it.
While attaching the trusses, check that they are square and firmly secured. Cut out the various joints using a compound miter saw and pay special attention to match the angles with that mentioned in the plans. once you have finished work on the roof finish off by laying down the shingles and felt underlayment (wood shed blueprints). Insulate the connection between the slanted roof sections to make it water proof and to prevent water from dripping through the joints during heavy rains. Protect the roof from rain and snow by covering it with a layer of weather proof emulsion paint.
Try to purchase wood which is of the best possible quality but still within your overall budget. To keep costs low, you could choose to only use the best brand of lumber for the vital load bearing parts of the shed like the posts and beams (how to build a garden shed). For constructing the interior sections like the floor panel or window frames you can use cheaper varieties of timber. This way you will be able to build a sturdy and durable shed within a budget.
In recent times, people have been buying so much stuff which they don’t really need, that they soon find they have run out of space both in their home and in their garage. If you are one of those folks who like to store all the items they ever purchased you will soon find that your garage is overflowing with junk.There may be many items in your home you do not wish to throw away just because of the fond memories linked with that item. Is your habit of hoarding up items causing your home or garden to look like a junkyard with stuff scattered all over.
You need a storage shed.The efforts and money it may take you to construct a shed will be repaid back to you many times over by the lifetime extra storage space you would be creating for yourself.In just a couple of days with some proper planning and good craftsmanship you can build yourself a neat little shed.Get the shed plans and follow the directions step by step and before you know it your shed project will be complete.
It will be easy for you to construct the shed base if you just stick to using the measurements provided in the shed plans. Your work will be greatly cut down if you build a shed whose sides are of standard size like 10 feet or 12 feet. Make sure you keep the windows pointed in the direction of the wind to allow for easy natural ventilation. If the land has a slope place your shed door towards the lower end of the slope. Verify that the land on which you will be building the shed is firm and solid without any sand pits. If your area receives heavy snow or rains you may want to make a deck to keep your shed foundation a some inches higher than the ground.
Walls can also be framed separately and then secured into place later on. Finally, the most important part of the shed which much is built with the utmost attention to details is the roof. Inexperienced craftsmen will be better off buying pre-constructed roof trusses rather than constructing them their own. Build the ridge beam first then fasten the joists to it.
While attaching the trusses, check that they are square and firmly secured. Cut out the various joints using a compound miter saw and pay special attention to match the angles with that mentioned in the plans. once you have finished work on the roof finish off by laying down the shingles and felt underlayment (wood shed blueprints). Insulate the connection between the slanted roof sections to make it water proof and to prevent water from dripping through the joints during heavy rains. Protect the roof from rain and snow by covering it with a layer of weather proof emulsion paint.
